Weft Installation Guide
Weft installation is a popular method for achieving fuller, longer hair with a natural appearance. Whether you’re looking for a long-lasting solution or a quick style change for a special event, understanding the tools, techniques, and maintenance steps can make all the difference. In this guide, we’ll break down the essentials of successful weft installation, including the most popular methods and expert tips for keeping your extensions looking flawless.
Popular Weft Installation Methods
Must-have tools:
- Curved weaving needle with strong thread for secure sewing
- Sectioning clips to keep hair organized
- Rat-tail comb for creating precise parts
- Heat protectant spray, especially if you plan to use hot tools after installation
Optional but recommended:
- Micro rings or beads, ideal for no-glue application methods
- Sharp haircutting scissors for trimming and blending wefts
- Spray bottle with water to keep sections damp during braiding or sectioning
Three Weft Installation Methods Overview

1. Sew-In Method: Durable and Long-Lasting
This traditional technique involves braiding your natural hair into cornrows and sewing the wefts onto the braids using a needle and thread. Sew-in weft installation is perfect for those seeking a long-term style, lasting up to 8 weeks with proper care. It’s ideal for textured or thicker hair, offering a firm and protective base.
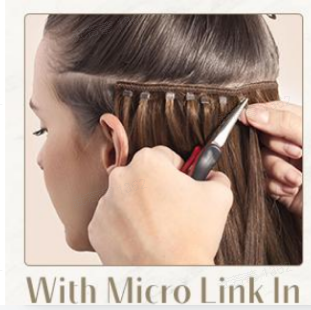
2. Micro-Ring Method: Adhesive-Free Flexibility
This glue-free approach uses tiny silicone-lined beads to secure the wefts to your hair. It’s gentle on the scalp and allows the extensions to be reused multiple times. Micro-ring weft installation lasts about 4–6 weeks and is great for those with sensitive skin or who want to avoid chemical adhesives.
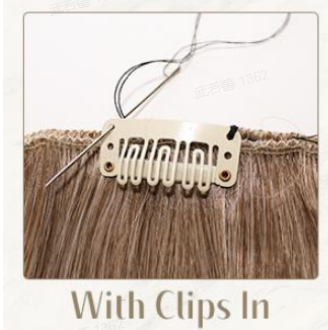
3. Clip-In Method: Quick and Easy
For those looking for temporary results, clip-in wefts are the easiest form of weft installation. Simply section your hair, clip the wefts in from bottom to top, and you’re done. This method takes less than 20 minutes and is perfect for events, travel, or quick everyday styling.
Choosing the Right Weft Installation for Your Lifestyle
| Method | Wear Duration | Pros | |
|---|---|---|---|
| Sew-in | 4–8 weeks | Long-lasting, strong hold | Weddings, events, daily use |
| Micro Ring | 4–6 weeks | Gentle on scalp, reusable | Sensitive skin, no glue users |
| Clip-in | 1 day (temporary) | Easy to use, no tools needed | Travel, parties, quick styling |
Professional Tips for Perfect Results
- Before installation: Wash and fully dry your hair. Avoid applying oil-based products, as they may affect grip or stitching.
- If styling: Always apply a heat protectant to both your natural hair and the extensions before using curling irons or straighteners.
- Trimming: For a natural blend, consider having a professional stylist trim the wefts after installation to match your haircut and texture.
Maintenance and Aftercare for Weft Extensions
- Washing: Clean your scalp weekly using sulfate-free shampoo. Focus on the roots and avoid heavy scrubbing to prevent loosening.
- Conditioning: Apply conditioner only from mid-length to ends. Avoid the roots and sewn-in areas.
- Night care: Use a silk pillowcase or wrap your hair in a silk scarf to reduce friction and prevent tangling.
- Brushing: Detangle daily using a wide-tooth comb, starting from the ends and working up to the roots.
Still have questions?
Please feel free to let us know.and we’ll respond within 24 hours.